Alarms
Introducción
Before explainig the functionalities and screens of the alarm menu, it is important to know the main characteristics of the alarms in Digital Metering:
- The configuration of the alarms is at the Supply Point level.
- Each Supply Point can have N subscriptions of each alarm type. Meaning that, for the same Supply Point it is possible to have two configurations of the alarm continuous consumption (for example).
- The same configuration can be applied, at the same time, to several sites, sectors, subsectors or supply points.
Alarms
This menu consists of three tabs:
- Configuración: permite gestionar (consultar y configurar) alarms de tipo: técnico y/o gestor. Una configuración de tipo gestor es aquella que viaja a un sistema externo. Por lo tanto, aunque Digital Metering permita más de una configuración por tipo de alarm, en el caso de tratarse de una configuración de este tipo, es muy importante que solo haya una configuración por cada tipo de alarms y punto de suministro. De lo contrario, cuando viaje más de una alarm al sistema externo, éste no sabrá identificar cuál es más prioritaria.
- Configuration: allows to manage (consult and configure) technician and/or manager type alarms. A manager type configuration can travel to an external system. Therefore, although Digital Metering allows more than one configuration per type of alarm, for this type of configuration, it is key to only have one configuration for each type of alarm and supply point. Otherwise, if more than one alarm travels to the external system, it will not be able to identify which one has priority.
- Custome alarms: allows to consult, create and edit alarms which are usually configured from an external application (OV or WC).
- Alarm analytics: allows you to consult the history of device and meter (consumption) alarms.
Consumption alarms
In Digital Metering can be configured the following types of consumption alarms:
- Consumption increase: helps to detect an increase in consumption above the configured threshold and period of time.
- Decrease of consumption: helps to detect a decrease in consumption below the configured threshold and period of time.
- Continuous consumption: also known as leakage, helps to detect continuous consumption during a configured period of time.
- Inactivity of consumption: helps to detect that in a period of time (hours or day/s) the consumption is zero or less than the threshold.
- Negative consumption: helps to identify if at least one sample of the day has had a negative consumption.
- Absence of reading: helps to know periods of time in which no signal has been registered.
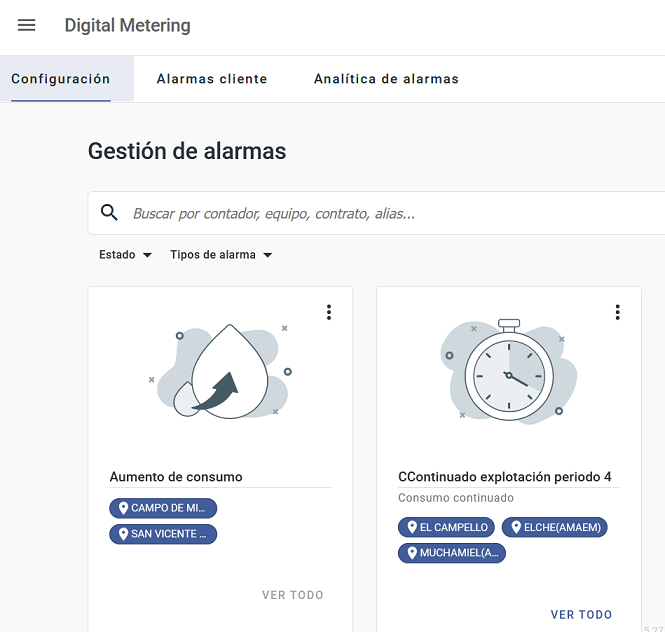
Configuration
This screen consists of:
- Dropdown with Tenants: allows to select the tenatn to consult data.
- Help button: Located at the top right of the screen, the help button explains each alarm.
- Search engine: Allows you to search by: meter, device, supply point, contract, alias or site.
- Filters: Located at the bottom of the search engine, allows to narrow your search. The available filters are:
- Status:
- Active: meets the conditions for the calculation and activation of the alarm.
- Inactive: the conditions for triggering the alarm are no longer met.
- Alarm type (multi selector).
- Status:
Based on the search and applied filters, each cards that appears on the screen is a previously configured alarm.
Each card consists of:
- Complementary actions button that allows:
- Activate Configuration: change the configuration status to active. If the card is already active, this action appears disabled.
- Disable configuration: change the configuration status to inactive. If the card is already inactive, this action is disabled.
- Delete configuration.
- Edit settings: enables the side panel to edit the alarm settings.
- Check information related to the configuration: alias, validity, user that created the configuration, entities included in the configuration.
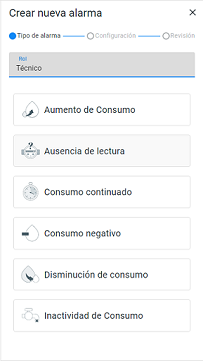
Configure a technical or manager alarm:
In order to configure an alarm:
- Select the
 .
and from the side panel:
.
and from the side panel: - Select the type of configuration (Role): Technical or Manager,
- Select the type of alarm,
- Select NEXT
- Complete the parameters. In order to finish the configuration, it is mandatory to complete the parameters with the exclamation mark.
- Select NEXT once the parameters are complete. The side panel shows a summary of the settings. If everything is correct, select FINISH.
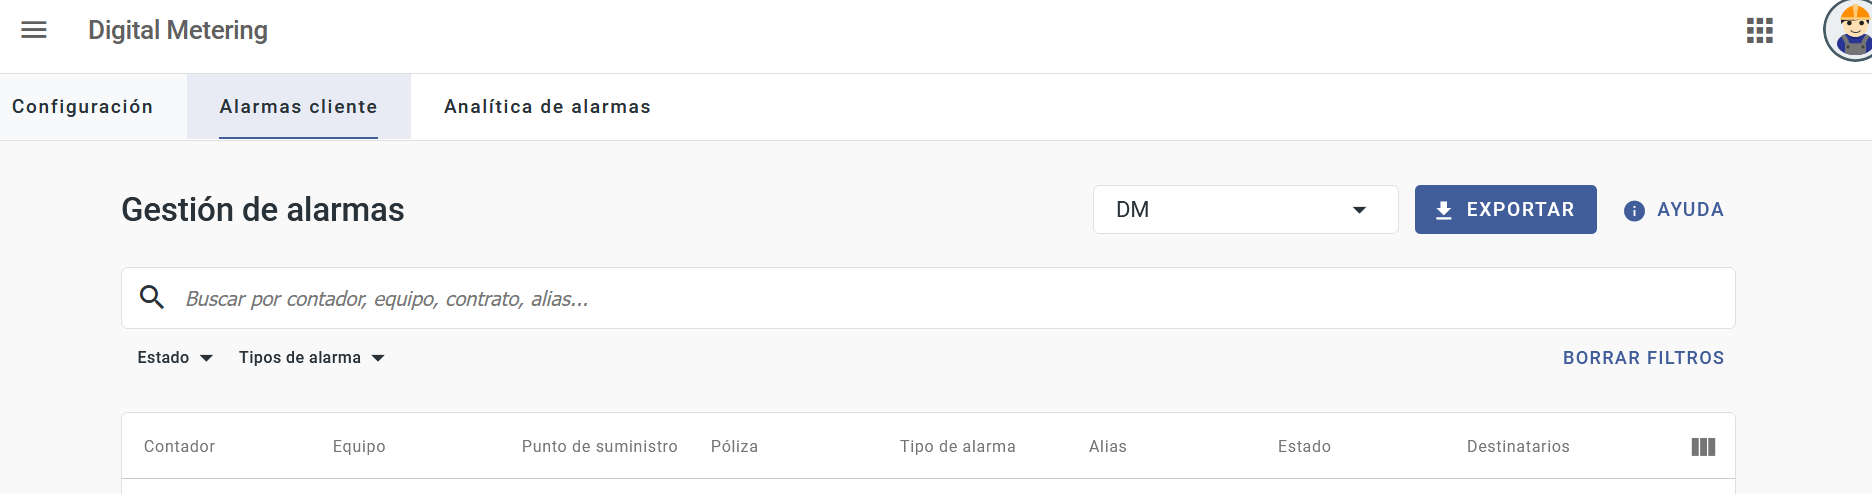
Client alarms
This screen consists of:
- Dropdown with Tenants: allows to select the tenatn to consult data.
- Help button: Located at the top right of the screen, the help button explains each alarm.
- Download: button that allows to download information of the table in CSV or Excel.
- Search engine: Allows you to search by: meter, device, supply point, contract or alias.
- Filters: Located at the bottom of the search engine, allows to narrow your search. The available filters are:
- Status:
- Active: meets the conditions for the calculation and activation of the alarm.
- Inactive: the conditions for triggering the alarm are no longer met.
- Alarm type (multi selector).
- Status:
Based on the search and applied filters, the table consists of the following columns: meter, device, supply point, contract, type of alarm, alias, status.
The table also has complementary actions button that allows:
- Disable configuration: change the configuration status to inactive.
- Delete configuration.
- Edit settings: enables the side panel to edit the settings of the selected alarm.
Configure a clients alarm:
In order to configure an alarm:
- Select the .
and from the side panel:
- Select the type of alarm,
- Select NEXT
- Complete the parameters. In order to finish the configuration, it is mandatory to complete the parameters with the exclamation mark.
- Select NEXT once the parameters are complete. The side panel shows a summary of the settings. If everything is correct, select FINISH.
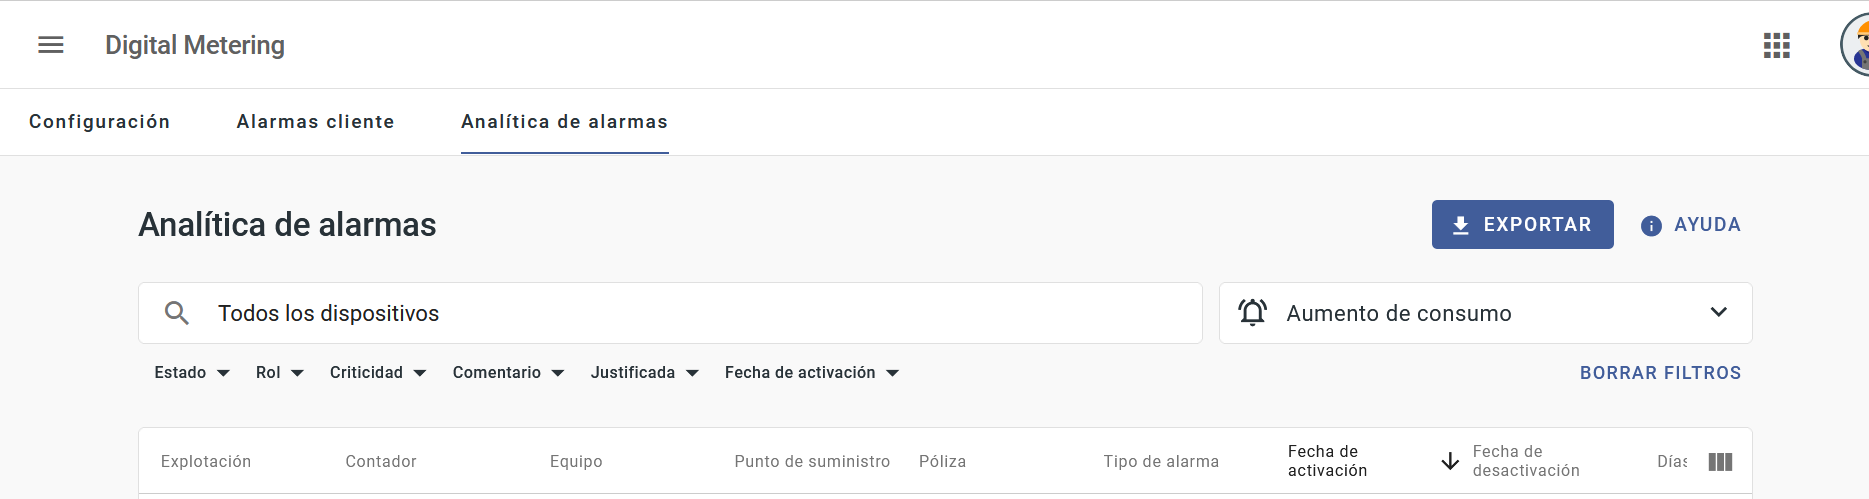
Alarm analytics
This screen consists of:
- Help button: Located at the top right of the screen, the help button explains each alarm.
- Download: button that allows to download information of the table in CSV or Excel.
- Search engine: that searchs through all the tenatns the user has access and allows to search by: meter, equipment, site, contract or supply point. If you click on the search engine, the option “Nothing specific to search for” displays, which allows you to search for all the devices to which the user has access.
- Alarm type. Located next to the search engine, it is a drop-down menu that allows to filter by type of alarm:
- Transmitter.
- Devices.
- Meters.
Once the search is done, the following sub-filters, located at the bottom of the search engine allows to narrow the search:
- Status: Active, inactive, both.
- Role (multi selector): Client, Manager, Technical.
- Criticality (multi selector): Critical, Informative, Major o Minor.
- Coment: All, yes or no.
- Justified: All, yes or no.
- Activation date.
Based on the search and applied filters, a table with the following columns appears on the screen: Site, Meter, device, Supply point, contract, alarm type, activation date, deactivation date, active days, status.
The table also has the Complementary Actions button that allows to add comments and mark an alarm as Justified

When adding a comment, the following icon is enabled in the table:

And when justifying an alarm, a green mark will be added at the left side of the row in the table and on the side panel appears the following icon:

When selecting a row of the table, the side panel with details of the configuration related to the selected meter is enabled.